Cheesecake Recipe: 7 Secrets to a Creamy, Crack-Free Classic Cheesecake
As I reflect on my favourite desserts, one that stands out is the classic cheesecake. There’s something about its creamy texture and rich flavour that never fails to impress. For me, a perfect cheesecake is more than just a dessert; it’s a way to make any occasion special.
Table of Contents
Mastering a classic cheesecake recipe can seem daunting, but with the right techniques, it’s entirely achievable. In this article, I’ll share 7 secrets to help you create a creamy, crack-free cheesecake that will wow your family and friends.
✨ Free Ebook: 5 Healthy Snack Recipes ✨

💌 Get more recipes by email! Subscribe to our newsletter for weekly diabetes-friendly recipes and tips. Subscribe →
Key Takeaways
- Understand the importance of ingredient quality
- Learn the secret to a crack-free cheesecake
- Discover the right baking technique
- Find out how to achieve a creamy texture
- Get tips on cooling and setting your cheesecake
The Perfect Cheesecake: Why It’s Worth Mastering
I’ve spent years perfecting my cheesecake recipe, and it’s been worth it. The journey to creating the perfect cheesecake is filled with trials and errors, but the result is truly rewarding.
My Journey to Cheesecake Perfection
My adventure in making the perfect homemade cheesecake began with a simple recipe, but it quickly evolved into a quest for perfection. I experimented with various ingredients and techniques, learning from each failure. One of the most significant lessons was the importance of using high-quality ingredients and following a precise method.
I recall my first attempt at making a New York cheesecake, which turned out to be too dense. This experience taught me the value of texture and the need for a smooth, creamy consistency. Through trial and error, I refined my technique, eventually achieving a silky smooth texture that rivals any professional bakery.
What Makes a Truly Great Cheesecake
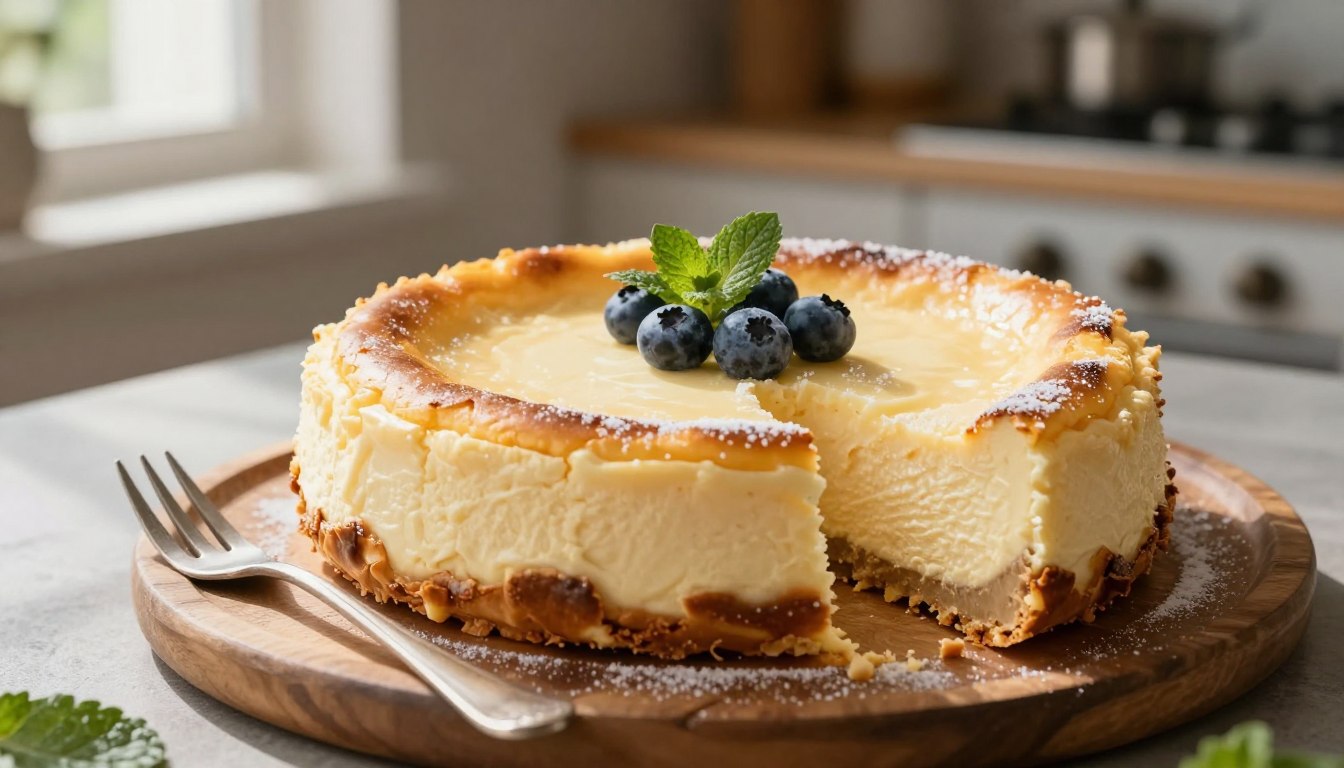
A truly great cheesecake is characterised by its creamy texture, rich flavour, and flawless appearance. The best cheesecake recipe should yield a dessert that is both decadent and refined. To achieve this, it’s crucial to pay attention to detail, from preparing the crust to the final baking stage.
A great cheesecake should have a firm edge and a smooth, creamy centre. Achieving this balance requires careful temperature control and patience. The result is a dessert that’s not only delicious but also visually appealing, making it perfect for any occasion.
Essential Ingredients for a Classic Cheesecake Recipe
The key to a perfect cheesecake lies in understanding the role of each ingredient. A classic cheesecake recipe relies on a few fundamental components that work together to create a creamy, crack-free dessert.
Choosing the Right Cream Cheese
The star of the cheesecake show is undoubtedly the cream cheese. For a baked cheesecake, it’s essential to use high-quality, full-fat cream cheese. I recommend using a brick-style cream cheese, such as Philadelphia, for the best results. Avoid using whipped or spreadable cream cheese, as they can introduce too much air and affect the texture of your cheesecake dessert.
The Supporting Cast: Eggs, Sugar, and Vanilla
Eggs, sugar, and vanilla play crucial supporting roles in the cheesecake. Eggs provide structure and richness, while sugar adds sweetness without overpowering the tanginess of the cream cheese. Vanilla enhances the flavour, adding depth to the cheesecake. Using room-temperature eggs is crucial for a smooth batter.
Crust Components: Graham Crackers vs. Alternatives
The crust is a vital component of a cheesecake. Traditional graham cracker crusts are a classic choice, offering a crunchy contrast to the creamy filling. However, alternatives like nut-based crusts or cookie crusts can add interesting flavour dimensions. When choosing your crust components, consider the flavour profile you want to achieve in your baked cheesecake.
By focusing on these essential ingredients and their roles, you’ll be well on your way to creating a cheesecake without cracks that’s sure to impress. Whether you’re a seasoned baker or a newcomer to the world of cheesecakes, understanding your ingredients is the first step towards cheesecake mastery.
Tools and Equipment You’ll Need
Before we dive into the cheesecake recipe, let’s talk about the essential tools you’ll need to make it happen. Having the right equipment can make a significant difference in the outcome of your classic cheesecake.
The Right Springform Pan
A springform pan is a must-have for baking a cheesecake. It allows for easy removal of the cheesecake once it’s baked and cooled. When choosing a springform pan, look for one that’s at least 3 inches tall to accommodate the cheesecake’s height. A non-stick coating can also be helpful, but make sure it’s durable and can withstand high temperatures. Some popular options include pans made from stainless steel or aluminium.
Key features to consider:
- Height: at least 3 inches
- Non-stick coating: durable and heat-resistant
- Material: stainless steel or aluminium
Must-Have Utensils and Appliances
In addition to a springform pan, you’ll need a few other utensils and appliances to make your cheesecake. These include:
- A mixing bowl: large enough to hold all your ingredients
- An electric mixer: stand or handheld, for creaming the cheese and sugar
- A whisk: for mixing eggs and other wet ingredients
- A rubber spatula: for scraping the sides of the bowl and folding ingredients together
- A water bath container: large enough to hold your springform pan
Secret #1: Room Temperature Ingredients Matter
Achieving a creamy cheesecake starts with a simple yet crucial step: using room-temperature ingredients. This fundamental principle is what distinguishes a good cheesecake from a great one. When all your ingredients are at the same temperature, they mix more smoothly, resulting in a uniform texture that’s essential for a creamy cheesecake.
Why Cold Ingredients Sabotage Your Cheesecake
Cold ingredients can lead to a cheesecake that’s uneven in texture and prone to cracking. When cream cheese, eggs, and other ingredients are not at room temperature, they don’t emulsify properly. This can cause the cheesecake to bake unevenly, potentially resulting in cracks or a soggy texture. Moreover, cold ingredients can make the batter lumpy, which affects the overall appearance and texture of your homemade cheesecake.
The science behind this is straightforward: when ingredients are at different temperatures, they don’t mix as efficiently. For instance, cold cream cheese doesn’t blend as smoothly with eggs that are at room temperature, leading to an inconsistent batter. This inconsistency can be mitigated by ensuring all ingredients are at room temperature before you start mixing.
How to Properly Bring Ingredients to Room Temperature
So, how do you bring your ingredients to room temperature? The simplest method is to leave them on the kitchen counter for about 30 minutes to an hour before you start baking. This allows enough time for the ingredients to warm up to room temperature. For a quicker solution, you can submerge eggs in warm water for a few minutes or gently warm the cream cheese in the microwave (though be cautious not to melt it).
Here are some tips to keep in mind:
- Plan: Take your ingredients out of the refrigerator well before you start baking.
- Use a thermometer: Ensure your kitchen is at a comfortable temperature, ideally between 70°F and 75°F (21°C to 24°C).
- Avoid overheating: Be gentle when warming ingredients; you don’t want to end up with melted or overheated components.

Secret #2: The Perfect Graham Cracker Crust
Creating a perfect graham cracker crust is an art that elevates your cheesecake dessert. A well-made crust provides a crunchy contrast to the creamy filling, enhancing the overall texture and flavour of your baked cheesecake.
Getting the Texture Just Right
The key to a great graham cracker crust is achieving the right texture. It should be crunchy but not too hard, and certainly not too soft. To get this just right, the ratio of graham cracker crumbs to butter is crucial.
Here’s a simple guideline to follow:
| Crust Ingredient | Ratio | Effect on Texture |
|---|---|---|
| Graham Cracker Crumbs | 1 1/2 cups | Provides base texture |
| Granulated Sugar | 1/4 cup | Adds sweetness, helps binding |
| Melted Butter | 6 tablespoons | Binds crust together |
Pre-Baking for Maximum Crispness
Pre-baking your crust is a step you shouldn’t skip if you want a crispy base for your baked cheesecake. To pre-bake, simply press the crust mixture into your springform pan, bake at 350°F (175°C) for about 10 minutes, and let it cool.
By following these tips, you’ll be well on your way to creating a cheesecake dessert that’s both visually appealing and deliciously textured.
Secret #3: Mixing Techniques for Silky Smooth Texture
Achieving a silky smooth texture in your cheesecake is largely dependent on mastering the right mixing techniques. The way you combine your ingredients can make or break your cheesecake, affecting not just its texture but also its appearance.

The Danger of Overmixing
Overmixing is one of the most common mistakes when making cheesecakes. It incorporates too much air into the batter, leading to a cheesecake that puffs up during baking and then collapses, often resulting in cracks. To avoid this, mix your ingredients just until they come together. It’s also crucial to use the right type of mixer and to mix at the appropriate speed.
Using a stand mixer with a paddle attachment can help minimise overmixing by ensuring a more controlled mix. Additionally, mixing your ingredients at room temperature can help them combine more smoothly, reducing the risk of overmixing.
Incorporating Air Without Creating Bubbles
Incorporating the right amount of air into your cheesecake batter is a delicate balance. You want enough air to give your cheesecake a light texture, but too much can lead to bubbles and cracks. Gently folding in ingredients and avoiding vigorous mixing can help achieve this balance.
| Mixing Technique | Effect on Cheesecake | Tips for Improvement |
|---|---|---|
| Overmixing | Cracks, dense texture | Mix just until ingredients come together |
| Under-mixing | Uneven texture | Ensure all ingredients are well incorporated |
| Gentle Folding | Light, smooth texture | Use a spatula to gently fold ingredients |
By mastering the right mixing techniques, you can create a cheesecake that’s not only delicious but also visually appealing, with a smooth texture and no cracks. This is a crucial step towards making the best cheesecake recipe that will impress anyone.
The Ultimate Cheesecake Recipe Step by Step
Now that we’ve covered the essential ingredients and tools, it’s time to dive into the ultimate cheesecake recipe step by step. Making a cheesecake can seem daunting, but by following these detailed instructions, you’ll be able to create a creamy, crack-free classic cheesecake that will impress anyone.
Crust Preparation
The foundation of a great cheesecake is its crust. To prepare the crust, start by preheating your oven to 325°F (165°C). In a medium bowl, mix 1 1/2 cups of graham cracker crumbs, 1/4 cup of granulated sugar, and 6 tablespoons of melted unsalted butter until the mixture is evenly moistened. Press this mixture into the bottom of a 9-inch springform pan, ensuring it’s compact and even. Bake the crust for 10 minutes, then set it aside to cool.
Filling Preparation
With the crust ready, it’s time to prepare the filling. In a large mixing bowl, beat 2 pounds of cream cheese until smooth. Gradually add 1 1/4 cups of granulated sugar and continue beating until well combined. Beat in 4 large eggs, one at a time, followed by 2 teaspoons of vanilla extract. Finally, mix in 1 cup of sour cream until the batter is smooth and creamy. As “Julia Child once said, ‘The only time to eat diet food is while you’re waiting for the steak to cook.’ In the case of cheesecakes, the ‘steak’ is the rich, creamy filling.”
“The perfect cheesecake is all about texture and flavor. You want it to be creamy and smooth, with just the right amount of sweetness.”
Baking Instructions
Pour the prepared filling over the cooled crust. To prevent cracks, bake the cheesecake in a water bath. Wrap the outside of the springform pan with aluminium foil to prevent leaks, then place it in a large roasting pan. Fill the roasting pan with hot water to about halfway up the sides of the springform pan. Bake at 325°F (165°C) for 1 hour and 15 minutes, or until the edges are set and the centre is just slightly jiggly. Turn off the oven and let the cheesecake cool slowly in the oven with the door ajar.
By following these steps, you’ll be able to create a creamy, crack-free cheesecake that’s sure to impress. Remember, patience is key – allowing the cheesecake to cool gradually is crucial to preventing cracks and ensuring a smooth texture.
Secrets #4 and #5: Water Baths and Temperature Control
Achieving a crack-free cheesecake is a feat many bakers strive for, and it all starts with understanding the importance of water baths and temperature control. These two elements are crucial in ensuring that your cheesecake bakes evenly and cools properly, thereby preventing the dreaded cracks that can ruin the appearance of your dessert.
Setting Up a Proper Water Bath
A water bath, also known as a bain-marie, is a cooking technique that involves placing your cheesecake pan in a larger pan filled with water. This method helps to distribute heat gently around the cheesecake, promoting even baking and reducing the risk of cracking. To set up a water bath, you’ll need a large, sturdy pan that can hold your springform pan. Fill this outer pan with hot water to about halfway up the side of the springform pan.
Key considerations for a water bath:
- Use a pan that’s large enough to hold your springform pan.
- Fill the outer pan with hot water to about halfway up the springform pan’s side.
- Ensure the water level is below the top of the springform pan to prevent water from seeping in.
Waterproofing Your Springform Pan
To prevent water from seeping into your cheesecake through the seams of the springform pan, it’s essential to waterproof it. Wrap the outside of the pan with heavy-duty aluminium foil, making sure to cover the bottom and sides thoroughly. This barrier will protect your cheesecake from water intrusion.
The Gradual Cooling Method That Prevents Cracks
Gradual cooling is just as important as the water bath in preventing cracks. After baking, turn off the oven and let the cheesecake cool in the oven with the door ajar. This slow cooling process helps reduce stress in the cheesecake, minimising the risk of cracks. Once the cheesecake has cooled completely in the oven, you can then remove it and let it cool further on a wire rack.
| Cooling Method | Effect on Cheesecake |
|---|---|
| Rapid Cooling | Increases risk of cracking due to sudden temperature change. |
| Gradual Cooling | Increases the risk of cracking due to sudden temperature change. |
By mastering the use of a water bath and gradual cooling, you’ll be well on your way to baking a cheesecake without cracks. These techniques, combined with the previous secrets, will help you achieve a perfectly baked cheesecake that is both delicious and visually appealing.
Secrets #6 and #7: Troubleshooting and Elevating Your Cheesecake
Mastering the art of cheesecake making involves not just following a recipe, but also troubleshooting common issues and elevating your dessert. Whether you’re a novice or an experienced baker, understanding how to address problems and add a creative twist can make all the difference in your cheesecake dessert.
Fixing Common Problems: Cracks, Texture Issues, and Sunken Centres
Despite your best efforts, issues like cracks, texture problems, or a sunken centre can occur. The good news is that many of these issues have simple solutions. For instance, cracks can often be prevented by ensuring that your ingredients are at room temperature and by using a water bath. If your cheesecake does crack, don’t worry – it can still be delicious and visually appealing with the right topping. Texture issues, such as a cheesecake that’s too dense or too soft, can usually be traced back to overmixing or incorrect baking times. A sunken centre might be due to overbaking or sudden temperature changes.
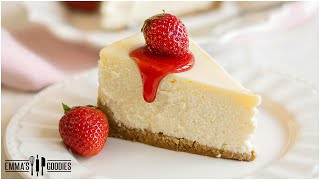
Classic and Creative Topping Options
One of the joys of making a New York cheesecake or any other style is experimenting with various toppings. Classic options include fresh fruit, caramel sauce, or a simple dusting of powdered sugar. For a more creative twist, consider toppings like candied nuts, chocolate ganache, or even a drizzle of flavoured syrups. The key is to balance the richness of the cheesecake with the flavours and textures of your chosen toppings.
Flavour Variations and Seasonal Adaptations
To make your best cheesecake recipe truly unique, don’t be afraid to experiment with different flavours and seasonal ingredients. For example, adding a hint of lemon or orange zest can give your cheesecake a bright, citrusy note. Seasonal adaptations might include pumpkin cheesecake for fall or a berry-infused cheesecake for summer. The possibilities are endless, and the flexibility of cheesecake recipes means you can continually innovate and surprise your guests.
Conclusion: Your Path to Cheesecake Mastery
Mastering the art of cheesecake making is a journey worth taking. By understanding and applying the 7 secrets to a creamy, crack-free classic cheesecake, you’ll be well on your way to creating a truly exceptional homemade cheesecake.
From ensuring room temperature ingredients to employing a gradual cooling method, each step plays a crucial role in achieving cheesecake perfection. With practice and patience, you’ll be able to perfect your cheesecake recipe and enjoy a deliciously creamy cheesecake that’s sure to impress.
Now that you’ve learned the techniques and secrets behind a great cheesecake, it’s time to put them into practice. Try your hand at making a homemade cheesecake, and don’t be discouraged if it doesn’t turn out perfectly the first time. With each attempt, you’ll get closer to achieving a creamy cheesecake that’s sure to become a favourite dessert.
To make this Cheesecake Recipe easier and more consistent, having the right kitchen tools really makes a difference.
| Appliance | Purpose | Recommended Product |
|---|---|---|
| Indoor Grill | Perfect for making pancakes and grilling | Ninja Foodi 6-in-1 Indoor Grill |
| Hand Mixer | Mixing gluten-free pancake batter | KitchenAid Hand Mixer |
| Multi-Cooker | Cooking, steaming, and air frying | Instant Pot Duo Crisp + Air Fryer |
| Electric Griddle | Ideal for fluffy gluten-free pancakes | Cuisinart Griddle & Grill |
| Smart Oven | Baking, toasting, and air frying | Breville Smart Oven Air Fryer |
| Blender | Blending pancake batter smoothly | NutriBullet Blender |
| Mini Waffle Maker | Making small pancakes or waffles | Dash Mini Waffle Maker |
| Belgian Waffle Maker | Versatile for pancakes and waffles | Hamilton Beach Belgian Waffle Maker |
🍰 Explore Our Best Dessert Recipes
- 🍰 Bakery-Style Classic Cheesecake with Cream Cheese – Rich, creamy, and irresistible
- 🍪 Healthy comfort food Recipes – Simple crowd-pleasing treats
- 🌱 Easy Vegan Meal Prep for Beginners – 21 make-ahead dessert recipes
- ⚡ Quick and easy desserts Glory – So good, they’ll make you a legend
- 💘 Italian Love Cake Obsession – The dessert that steals souls
- 🍌 Best Pecan Upside Down Cake – Ready in 45 minutes
- 🧈 5-Star Butter Pecan Cake Made Easy – Foolproof & fabulous
✨ Free Ebook: 5 Healthy Snack Recipes ✨
💌 Get more recipes by email! Subscribe to our newsletter for weekly diabetes-friendly recipes and tips. Subscribe →
About the Author
This recipe was created and reviewed by Cooking All Recipes, a food-focused platform dedicated to easy, tested, and family-friendly recipes.
Our recipes are inspired by classic American and British cuisine and are carefully written to ensure clarity, taste, and reliability for home cooks.
Each recipe is tested multiple times to ensure consistent results for home bakers.

FAQ
What is the best way to prevent cracks in a cheesecake?
Can I use a different type of crust instead of graham crackers?
How do I know when my cheesecake is done baking?
What’s the importance of using room temperature ingredients?
Can I make a cheesecake without a springform pan?
How do I store leftover cheesecake?
How did you find this recipe?
There are no reviews yet. Be the first one to write one.